Showing posts with label Inspiration. Show all posts

27 February 2017

Embroidery Catch-up

I've been playing catch-up on my Embroidery Sampler.
I've now completed Band 7 


The background looks rather 'washed-out' on these pics, it is a much better green in real life.
And the sampler so far.


And if you are counting only 6 bands... yes you are correct. I missed one out because I just didn't feel like doing it, lol.
_______________________________________________________________

And here is a Finish for my YOP.

The crochet scrumbles from last week turned into a pillbox hat (or is it 'pillar box' hat?).


And I have stitched a few more hexies together, but nothing worth showing that the moment. 

On the non-stitching side of my life - we have added these girls to our paddocks.
Eenee, Meenee, Mynee & Mo


That is the sort of lawn-mower that I like best, hahaha.

So that was my week.

Hope you have a great stitching week ahead.


p.s. if any of you saw my post on Facebook about my a$$ over t!t tumble, this is just to let you know that I survived without damage, and I'm still laughing at how funny it was. Poor Tony didn't know whether to laugh or panic when both my feet were level with his chest and my head was disappearing over the 'A' frame of the trailer.


15 July 2015

A Fun Cro-Doodle Project

Cro-Doodle is my way of saying this project is a hybrid.
Crochet inspired by Zen Art Doodles.

There is a group I'm in on Ravelry that threw a challenge at members to create a free form crochet/knit tangle from an animal Zentangle.

I prefer to call my drawing of this style Zen Art Doodles, and proceeded to produce the art work that I will be interpreting in crochet.

I will not reveal the whole drawing until all the crochet is complete, and I will leave the 'animal' as a surprise at the end.

Here is the first small section that I have recreated in crochet so far.


14 September 2014

FREE Crochet Heart Tutorial by Cyra

  -  FREE TUTORIAL - 
 by Cyra Lewis 

 A 3-D Crocheted Heart Tutorial 

Step-by-step photos included.


I made mine using #20 crochet thread with a size 1.00 crochet hook.
The heart was just the right size to use on a homemade 
birthday card for someone special (photo above).

     This heart could also be made as a cushion, in wool or yarn of your choice.     
The finished size would be dependent on the thickness of yarn used and the size of your crochet hook.


Crochet Heart Tutorial
UK crochet terminology is used here. 
Please see the end of this blog for a US terminology alternative.

Starting from the top of the heart.

Ch4, sl.st. to 1st ch to form a ring.

Ch1, 8dc  into ring, join with a sl.st. to beg. ch. (8sts)

Ch1, 2dc in every st around, join with a sl.st. to beg. ch.  (16sts)

Ch1, 1dc in same st., 1dc in each of next 2 sts., 2dc in the next st., *1dc in each of the next 3 sts., 2dc in the next st.,**. Repeat from * to ** two more times to the end of the round, join with a sl.st. to beg. ch.  (20 sts)


Ch1, working 1dc in every st. make 80dc working in the round, 
i.e. do not join rounds with sl.st. When you reach the beg. of the round just dc into the next dc st. and work in a spiral for 80 sts, ((or four rounds))


When you get to this point cut the thread leaving a tail of about 6 inches.

Now you have to make another 'upside-down cup' exactly the same, but do not cut the thread on the second one when you get to this point.


The following two photos show you how to join these two 'cups' together.
Using the tail thread on the first cup, oversew three stitches only, making sure that you join the second cup immediately after the last dc that you made (2nd photo)


Put your hook back in the loop from the last st. made, and st. 1dc in every st. going around the outside of both cups, but do not dc in any of the sewn sts.

After stitching one round of dc. in every st. around the whole piece, you will start dec. (st.2dc.tog.) at each outer edge.


Continue stitching dc. rounds, still working in a spiral, decreasing (st.2dc.tog.) at each side edge of the heart.

After about 5 or 6 rounds the hole will be getting significantly smaller (heading towards the point of the heart).

Now is the time to start stuffing the heart with the filling of your choice. This small heart does not take much stuffing at all, but a cushion sized heart will obviously take quite a bit more stuffing.


Continue the dc. stitching in every st. around and dec. at the edges.

(Below the joining of the two cups, it takes about 14/15 rounds to get to the point)

As you get closer to the point of the heart you may need to insert a little more stuffing to fill the point.

When you cannot dec. any more, sl.st the last two sts. tog. to make the point of the heart, cut the thread, pull through, and finish by weaving the tail inside the stuffed heart.


I Attached my heart to the card by making two holes in the card and sewing the heart in place through these two holes, tying the tails together and then losing the tails by weaving the thread back into the heart.


Abbreviations:

Ch. ------ chain 
dc   ------ double crochet
st.   ------ stitch
sts. ------ stitches
sl.st. ----- slip stitch
beg. ----- beginning
dec. ----- decrease
st.2dc.tog. ----- stitch 2 double crochets together


UK                      US

ch ....................... ch
dc ....................... sc (single crochet)


   <><><><><><><><><><><><><><><><>   


I can see these hearts getting used in many ways.
I hope you have fun with yours.

Please leave a comment here if you use my tutorial and feel free to share a link to your project.


30 July 2014

2014 Int. Free Form Fiberarts

I can finally reveal my Free Form Cerise Fiberart Neck Adornment.

It has now been published in the book: One Color

by the International Free Form Fiberarts Guild, of which I am a member.


The book is available at the following link:


ALL profits from the sales go to an International Charity (or charities) nominated by the members. 


I am honoured and proud to be in the company of such talented and inspirational fiber-artists, and I am pleased to call them all my friends.


12 February 2014

Valentine's Hearts Inspiration

  Hearts From The Past  

Here are a couple of heart projects from my previous blogs
(just in case you need a last minute card idea)


18 December 2013

Crochet UFO's - Coffee & Cream

I have picked up my crochet UFO's again this week.

The Freeform Coffee & Cream Cape-let is progressing nicely.
Here are the updated stitching photos with the piecing together of some of the parts.


I really surprised myself with how much I managed to do on this project.
Still a little way off from completing it though, but with a bit of perseverance (and people leaving me alone) I may be able to get it finished before we go away for on holiday.

___________...............................................................__________

One more fun project - started and finished - this week.
White Crocheted Basket, no reason other than because it was fun.
(Tutorial for this coming soon on my blog)


___________...............................................................__________

I also picked up the Lovers Knot Tunic project.
This would be great to wear over a summer dress, t-shirt or camisole, and I really want it finished to take with me when we go off to our forest/mountain retreat in two weeks.
I shall probably be working on this over Christmas.

This is the back of the tunic. About half way.


I ADORE the yarn. Just look at all those scrumptious pops of colour.
It is the most fabulous yarn I have ever seen ... which is why THIS tunic is for ME.
Sometimes it's just too hard to say 'no'.

___________...............................................................__________

Tony and I had a day out on the Awhitu Penninsular, which is only a ten minute drive from home.
We took a picnic (complete with table and chairs) 


Sea views at every turn, and isn't that a beautiful blue sky and with clouds only forming over the water.
It was a hot day.

The next photo is where we set the table and chairs for our picnic. 
The shade under the trees was welcome, and there was a gentle breeze blowing from the east.


And then we strolled along the beach following this inlet.
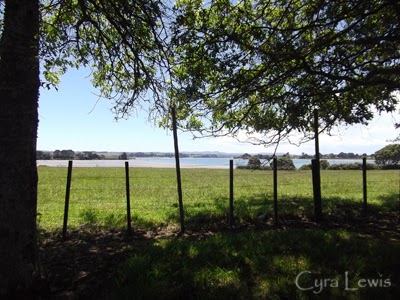
You can't actually see our house from here, but it would be about central in the picture and about 2ks inland.


19 September 2013

Digital Art for Inspiration

What do you do when you can't sleep at night?

Me?....... I have a PLAYTIME on my computer.
Last night I produced some weird and wonderful digital art which I will share with you here.
I would love to use them as inspiration for fibre arts. 
I can see quilts in them.
Patchwork - Crazy Quilting - Mosaic - Collage - Embroidery - Canvas Work - Colourwash